Privacy statement: Your privacy is very important to Us. Our company promises not to disclose your personal information to any external company with out your explicit permission.
First, the scope of application
The SAE J933 standard specifies the mechanical and quality requirements for steel self-tapping screws for automotive and related industries. Not suitable for corrosion resistant steel (stainless steel) screws. Most of these screw types and dimensional requirements are specified in ASME 818.6.3-2010.
The main purpose of this standard is to ensure that the screws are normally screwed into the structural material. The connecting threads are formed or cut, while the screws themselves are threaded and do not deform and trip during assembly or use.
The standard imposes certain restrictions on the basic materials and manufacturing processes, but considering the size and shape of the parts are chemically treated, the heat treatment is susceptible to small differences, and experience has shown that these differences must be maintained during processing. The stability is also quite difficult. Therefore, some limitations can only be added to the “Performance Requirements” after a new and more complete performance test has been developed.
Second, the performance requirements
1. General requirements
If the screw is delivered after the demand is delivered (or under the control of the purchaser), the screw manufacturer is not responsible for the defects caused by the plating. At this point, use the same set of other screws to remove the plating, dry, lubricate with oil, and then retest under normal surface.
2. Torsional strength test
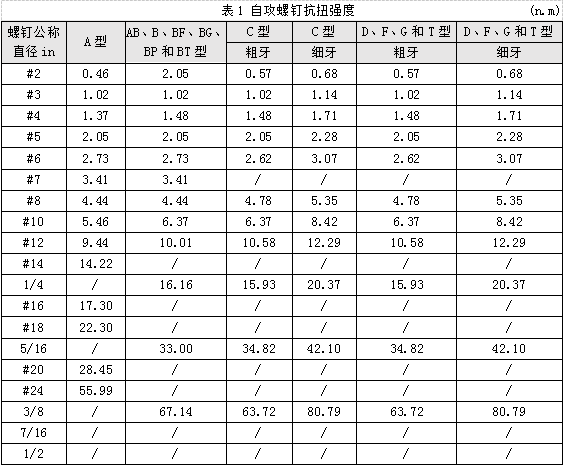
Self-tapping screws torsional strength are shown in Table 1.

Material
The screws shall be made of a killed steel that meets the chemical composition of Table 2 using a cold heading process.

It should be treated in a carbonitriding or gas carburizing equipment. The screws should be quenched in a gaseous medium and then heated to 650 o F for tempering.
If the manufacturer uses a continuous (not batch) quenching process to stably ensure uniform surface and core hardness, the manufacturer may agree to use cyanide equipment.
3. Carburized layer depth
The midpoint between the crest and the bottom of the thread is measured on the side of the thread, and the measured value should meet the requirements of Table 3.

The surface hardness after tempering is at least 45HRC. For conventional quality control (with carburized layer depth and screw shape permitting), the surface hardness can be measured at Rockwell 15N at the end, stem or head. If the above method is not applicable, it can be replaced by a knoop or diamond pyramid indenter and a microhardness tester with a load of 500 g. In this case, the thread form of the appropriately prepared axial metallographic sample should be used. The hardness is measured on the side.
5. Core hardness after tempering
After tempering, the core hardness is 28 to 38 HRC . At a sufficient distance from the end of the screw, it is measured at the midpoint of the radius through the section of the thread diameter.
6. Microstructure
By metallographic examination, there should be no free ferrite between the core and the surface.
Fourth, the test requirements
The maximum hardness should not exceed 38HRC, preferably ≤36HRC to ensure no damage during assembly and use.
Author:
Ms. ALEX
Phone/WhatsApp:
Contactar proveedor
Author:
Ms. ALEX
Phone/WhatsApp:
September 24, 2021

Privacy statement: Your privacy is very important to Us. Our company promises not to disclose your personal information to any external company with out your explicit permission.

Fill in more information so that we can get in touch with you faster
Privacy statement: Your privacy is very important to Us. Our company promises not to disclose your personal information to any external company with out your explicit permission.